Monday, February 27, 2012

Wall plaque/ bow hanger

I've seen several people make these wall plaque/bow hangers and I thought they were so cute. I kept telling myself that I could make that and I finally set down to do one. It took about 3 hours to do the whole project and cost about $10 not including the designer paper I already had on hand and the $8 bottle of Mod Podge, since that will go to other projects.

Supplies: Designer paper (Stampin Up), wood wall plaque, Mod Podge, foam brush, appliques (I used a cloud and sun), ribbon, wall hangers, glue gun. I got most of the supplies except the paper from Michaels.


Here's a picture of most of the supplies:


First I cut strips and Mod Podge'd the sides of the plaque, then cut the paper to fit the front of the plaque and applied the adhesive to both the wood plaque and the back of the paper. Then smoothed it down gently.
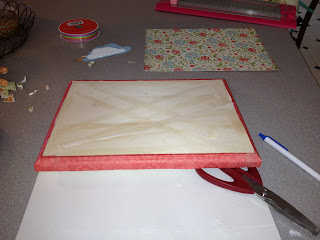
I used a cricut machine and the School Book cartridge to cut the letters. The size for the dial I think was a 4 1/2. I then applied the letters to the plaque using Mod Podge again. This stuff is amazing! I used adhesive on the back of the letters and then smoothed them gently on the plaque and then once they had a minute or two to set I brushed Mod Podge on top of the letters to seal them in.
I forgot to take a picture describing what I did for the sun. Basically, the sun was plain wood colored. I cut/tore orange paper into little strips and then applied Mod Podge to the sun and the paper and stuck the paper to the sun.
Next I applied the sun and the cloud to the plaque using a glue gun. I cut 4 equal pieces of ribbon and attached the ribbon to the back of the plaque using a generous amount of glue from the glue gun.
I tied a knot at the bottom of each ribbon to keep the barrets from slipping off the bottom. But was thinking a fun big bead of some sort would be really pretty as well.

I haven't bought a wall hanger yet for the back or else I'd show you what it looks like on the wall. I'm not sure if I"ll end up using the glue gun to attach the wall hanger. I think that I would like to use some small screws to attach the hanger to make sure its a little more sturdy.

Happy Crafting!
Saturday, February 25, 2012

St. Patrick's Day Hair Barretts for a little girl


So I have a friend that is fantastic at making bows and I've been tempted to get into it myself, especially since learning we have a new little girl on the way. I saw on Pinterest where someone had made felt four leaf clover garland and I thought I could just do one at a time and glue to a bow - ta da!
Here's the steps, and it took less than 30 minutes to make 2 of these.
1. cut about 1 1/2 inch square clover pieces out of felt
2. Double pinch at the bottom of each clover and insert thread.
3. Thread through all four clover leafs and then connect to the first.
4. Pull the thread tight and then secure it by sewing through the back several times.
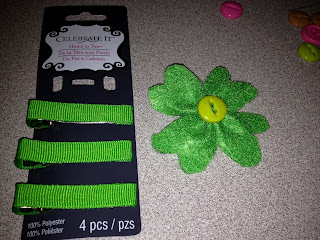
5. Attach a button or other embellishment to the front.
6. I bought the premade barretts from Michaels. I was planning to buy the ribbon and the plain metal barretts, but couldn't find them and although this was a little expensive $2.99 for 4 barrets with the ribbon already on, I figured one less step for my new craft idea. In any case. I spread liquid stich on the barrett.
7. Then firmly attach the the clover to the barrett.
Yay! You're done! Super cute!

Wednesday, January 25, 2012

Blueberry Muffins

My biggest craving this pregnancy has been blueberry muffins. This morning was the second time I made some and they were fantastic. I wanted to repost and recommend the recipe I've been using.
If you follow the recipe exactly you'll get the best homemade blueberry muffins, I've ever made. A couple of tips that I found. The recipe makes 6 large muffins if you don't fill the muffin tin all the way to the top. I used just less than a 1/2 cup for each one and was able to get 6 equal sized muffins. I would also recommend letting the butter soften at room temperature for several hours for the crumble mixture to mix well. Last but not least, I have a gas oven and we're in Wichita, so not at sea level, but not quite high altitude, it takes about 23 minutes for the muffins. 2o minutes and they're not quite done in the middle, but 24 minutes leads to the the sides being a bit browner.
Good luck!

Friday, January 20, 2012

My first post - Baby shower card

So, I created a blog for my family updates and I'm really bad about keeping it up to date. But I'm feeling motivated and thought that I might try blogging some of my crafts and projects that I do.

I'm co-hosting a baby shower next month and developed these baby shower invitations to send out to the guests.
The majority of the supplies are Stampin Up, but you could tweek some things if you don't have the specific things I used.
1. I cut 8 1/2 x 11 white and pink cardstock into four equal sections
2. I took black ink and used "hello baby" from the Teeny Tiny Words stamp set and stamped once towards the top corner of the card.
3. I used Pretty in Pink ink and did lines of words using the "hello baby" stamp across the top in 3 or 4 lines.
4. Using the Big Shot, and the Manhattan Flower Embossing Folder I put the pink card stock through the machine. Then I cut the top edge close to the outer textured ridge.
5. I cut out a white or black circle using a 1 3/4 punch.
6. I used a Martha Stewart baby carriage punch in either white or black cardstock.
7. I glued opposing color carriage to the circle.
8. Then punched two holes through the top of the circle and Flower embossed cardstock.
9. Then secured them together with ribbon. The colored ribbon I used was from Wal-Mart; a pink and white checkered pattern.
10. then I secured the pink cardstock to the white cardstock.
11. I took a corner rounder and rounded all four edges.
12. On the back side of the card I used "Introducing" stamp set and "Sprinkles" stamp set. "You're Invited" and the event details stamp were stamped in black ink.
13. The Sprinkles stamp was stamped in Pretty in Pink ink, and only along the sides.
14. I used a calligraphy pen to put in the details for the party and put the registry information in the space underneath the RSVP line.
Happy Stamping!