Monday, January 27, 2014

Creating a diaper cake - anyone can do it!

I've made several diaper cakes now and I really enjoy doing it and including items that I think new moms and seasoned moms alike will need for the new baby, plus a few extras! It seems like a lot of work, but its really not. I made 2 diaper cakes, minus the ribbon, because I still need to purchase some, in about 1 1/2 hours.
 
Sorry this picture turned out a little blurry. The items laid out are actually for 2 diaper cakes. I have 2 friends coming up that are having boys and figured I could knock them out at the same time.
Items pictured include: a cake cardboard circle to keep the bottom stabilized, little rubber bands (I use the kind for my girls hair, because I always have a ton on hand), regular large rubber bands, some color coordinating grass, the ribbon of your choice (not pictured - I still need to go out and get ribbon to finish off the layers. This will hide the rubber bands you see on the outside of the circles and give you something to attach the extras to), baby lotion, baby wash, gas drops, diaper cream, pacifiers in a case, baby ibuprophen, a little bear with teether, a 3 pack of onesies, a blanket, a pack of socks 1 large box of size 1 diapers (this was used for 2 diaper cakes), and a box of wipes.

Here's how I start. A lot of other people keep the diapers flat and can get them to turn in a circle, this technique did not work for me. I actually roll each diaper, tucking the picture part of the diaper on the inside of the roll and secure with the small rubber bands. You can see some stacked up in the background. I just roll them all or you can take a break after awhile and work on making your large base layer.

 I start with five of the rolled diapers standing on their ends and secure with a large rubber band. Then I just pull the rubber band out a little and start working more diapers in.
 

I keep doing this until I can't see the round cake bottom any more.

The next part is purely dependent on you. I found an inexpensive, but cute whale blanket. However, it wasn't think enough to make the next layer, so I wrapped it around a box of wipes - 2 for 1! You can also, just do a large/thick blanket in a circle or a hooded towel. My suggestion on this step is to fold it in thirds. You want the layer to be the same or smaller in width than the bottom base layer of diapers. I actually, just secured the ends of the blanket together with some clear scotch tape.

Roll the remaining diapers into a smaller cake layer and place the layers on top of each other like pictured.

For the last layer, I took the pack of onesies and folded each one in thirds and then rolled them up, secured them with tape and then secured the 3 together with another large rubber band.

Place the onesie layer on top of the others.

You'd be surprised once you add ribbon and some decorative grass to the basic layers how beautiful and simple the diaper cake looks. You can leave it just like that if you choose. In the picture here, you can see I'm going to add lotion, wash, diaper cream, ibuprophen, gas drops, pacifiers, some socks, and a cute little bear topper.

It's not pictured but you'll just place the ribbon around the basic layers and then secure your extras with either scotch tape or more ribbon. I've also had friends use push pins, but I'm so afraid that one will get missed and it would be terrible if mom, friend or baby got hurt on the pins. You can place your decorative grass in between the layers for some extra flare. Good luck! If you're looking to see what a diaper cake can look like completely finished with grass and ribbon here's the link to a previous post I made for diaper cakes: http://amanda-whyisntthisworking.blogspot.com/2013/02/my-first-diaper-cake.html

Sunday, September 8, 2013

Dr. Seuss Wall Decor

So, to say I love Pinterest would be an understatement. I have more pins than there is actually time to do all the things listed. However, I couldn't pass up on this one craft idea for Rachel's room.

Here's the link to the original post: http://fancyfrugallife.com/under-the-stairs-closet-turned-kids-book-nook/

Here's my supplies: 4 Dr. Seuss bags I picked up in the dollar bins at Target at just before the start of school, 2 - 2 packs of small canvases that you can buy at Walmart; a can of spray adhesive, a staple gun and staples, some scissors.

I also bought some premade wood letters at Walmart and used some white paint I already had at home to hang on the wall next to the canvas art. I think it turned out great and didn't cost that much! Rachel's always talking about her Dr. Seuss pictures.

Rachel wants a Princess mirror

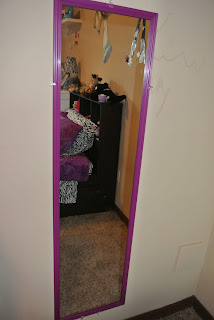
Rachel had been asking and asking to have a Princess mirror, that was purple and glittery. I didn't have a clue where I was going to get said princess mirror, so I figured I'd have to make her one.
This is the beginning shot. Materials included the basic $10 mirror from Walmart; and they actually had glittery foam shapes, princess shapes, and letters. So I just stuck a bunch on and called it good.

Rachel was asking us on the way home from her hanging out with a friend about going to the store to buy said Princess mirror, and she was so surprised when she got home and found her mirror, just the way she wanted it!
 

Sunday, February 17, 2013

My first diaper cake

Well, I officially attempted my first diaper cake. I think they are so cute, and such an awesome present. It's more than just putting diapers and some key baby items in a gift bag for an expecting parent. You took the time to develop something beautiful and meaningful for the new parent to be.

Thankfully, the mom-to-be gave us a giraffe theme. I love giraffes, so I knew that I had seen some giraffe print ribbon at Wal-Mart and that there would be a giraffe toy of some sort available to gift.

Here is a picture of the finished product. I'm really pleased with myself and my first attempt.  It only took about 2 1/2 hours to roll all the diapers, assemble the cake, and add all the extras.

Detailed description:
  • First layer: Rolled each diaper and wrapped with tiny hair elastics, then took larger rubber bands and groups rolled diapers in a circle. Secured circle with balloon string.
  • Second layer: maxi pads wrapped with animal print fleece blanket. Used scotch tape to secure end then balloon string again for the circumference.
  • Third layer: same as first only smaller circumference.
  • Fourth layer: 2 onesies and a pair of pants rolled up and secured.
  • Tied decorative baby blue ribbon around each layer to cover up balloon ribbon and rubber bands and then a giraffe styled ribbon on top of the blu. I secured then by tying a bow at the back. I used the decorative grass from dollar tree in between each layer. I tied "extras" to the ribbon using balloon string and the same blue and giraffe ribbon and scotch tape.
My only concern with the diaper cake is the different layers are not secured together. I coudn't come up with a good solution for this, and I didn't have a large cardboard circle to place the diaper cake on. I've been trying to carefully transport it out of the way until the party on Sunday.

Monday, February 27, 2012

Wall plaque/ bow hanger

I've seen several people make these wall plaque/bow hangers and I thought they were so cute. I kept telling myself that I could make that and I finally set down to do one. It took about 3 hours to do the whole project and cost about $10 not including the designer paper I already had on hand and the $8 bottle of Mod Podge, since that will go to other projects.

Supplies: Designer paper (Stampin Up), wood wall plaque, Mod Podge, foam brush, appliques (I used a cloud and sun), ribbon, wall hangers, glue gun. I got most of the supplies except the paper from Michaels.


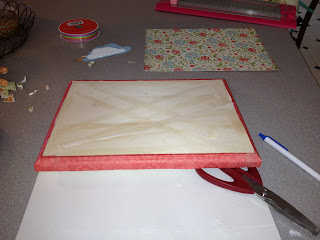
Here's a picture of most of the supplies:


First I cut strips and Mod Podge'd the sides of the plaque, then cut the paper to fit the front of the plaque and applied the adhesive to both the wood plaque and the back of the paper. Then smoothed it down gently.
I used a cricut machine and the School Book cartridge to cut the letters. The size for the dial I think was a 4 1/2. I then applied the letters to the plaque using Mod Podge again. This stuff is amazing! I used adhesive on the back of the letters and then smoothed them gently on the plaque and then once they had a minute or two to set I brushed Mod Podge on top of the letters to seal them in.
I forgot to take a picture describing what I did for the sun. Basically, the sun was plain wood colored. I cut/tore orange paper into little strips and then applied Mod Podge to the sun and the paper and stuck the paper to the sun.
Next I applied the sun and the cloud to the plaque using a glue gun. I cut 4 equal pieces of ribbon and attached the ribbon to the back of the plaque using a generous amount of glue from the glue gun.
I tied a knot at the bottom of each ribbon to keep the barrets from slipping off the bottom. But was thinking a fun big bead of some sort would be really pretty as well.

I haven't bought a wall hanger yet for the back or else I'd show you what it looks like on the wall. I'm not sure if I"ll end up using the glue gun to attach the wall hanger. I think that I would like to use some small screws to attach the hanger to make sure its a little more sturdy.

Happy Crafting!

Saturday, February 25, 2012

St. Patrick's Day Hair Barretts for a little girl


So I have a friend that is fantastic at making bows and I've been tempted to get into it myself, especially since learning we have a new little girl on the way. I saw on Pinterest where someone had made felt four leaf clover garland and I thought I could just do one at a time and glue to a bow - ta da!
Here's the steps, and it took less than 30 minutes to make 2 of these.
1. cut about 1 1/2 inch square clover pieces out of felt
2. Double pinch at the bottom of each clover and insert thread.
3. Thread through all four clover leafs and then connect to the first.
4. Pull the thread tight and then secure it by sewing through the back several times.
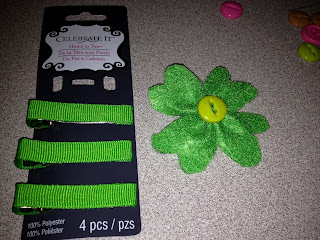
5. Attach a button or other embellishment to the front.
6. I bought the premade barretts from Michaels. I was planning to buy the ribbon and the plain metal barretts, but couldn't find them and although this was a little expensive $2.99 for 4 barrets with the ribbon already on, I figured one less step for my new craft idea. In any case. I spread liquid stich on the barrett.
7. Then firmly attach the the clover to the barrett.
Yay! You're done! Super cute!

Wednesday, January 25, 2012

Blueberry Muffins

My biggest craving this pregnancy has been blueberry muffins. This morning was the second time I made some and they were fantastic. I wanted to repost and recommend the recipe I've been using.
If you follow the recipe exactly you'll get the best homemade blueberry muffins, I've ever made. A couple of tips that I found. The recipe makes 6 large muffins if you don't fill the muffin tin all the way to the top. I used just less than a 1/2 cup for each one and was able to get 6 equal sized muffins. I would also recommend letting the butter soften at room temperature for several hours for the crumble mixture to mix well. Last but not least, I have a gas oven and we're in Wichita, so not at sea level, but not quite high altitude, it takes about 23 minutes for the muffins. 2o minutes and they're not quite done in the middle, but 24 minutes leads to the the sides being a bit browner.
Good luck!